TanStack Start: Part 2 - Development Tools
In the previous tutorial, we set up a TanStack Start project from scratch with TypeScript, Vite, and file-based routing. In this tutorial, we'll improve our development workflow[1] by setting up IDE extensions, code formatting, code linting, Tailwind CSS, and browser-based devtools.
Here are the steps we'll follow:
- Install editor extensions
- Configure editor settings
- Configure code formatter
- Configure code linter
- Configure Tailwind CSS
- Install TanStack Devtools
- Install React Devtools
Step 1 - Install Editor Extensions
You can install extensions to enhance your code editor with language-specific features like autocomplete, error highlighting, and formatting. Open the Extensions panel[2] in VSCodium, VS Code, or Cursor using the shortcut Cmd/Ctrl+Shift+X and install these three extensions:
Oxc - Provides fast code formatting and linting for JavaScript and TypeScript using the Oxc toolchain[3]. It is a faster and lighter alternative to older tools like ESLint and Prettier.

Tailwind CSS IntelliSense - Adds autocomplete suggestions, syntax highlighting, error/bug detection, and hover previews for Tailwind CSS utility classes within JSX.

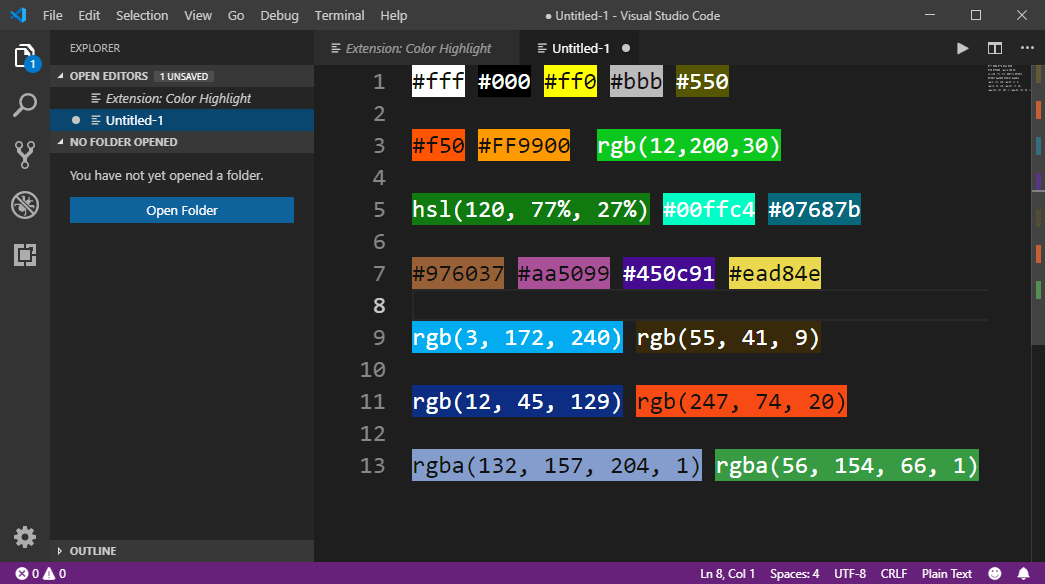
Color Highlight - Displays inline color previews next to CSS color values (hex codes, RGB, HSL, etc.) in your code. This helps you visually identify and pick colors easily.
After installing the extensions, you may need to reload your code editor for them to take effect. You can do this by pressing Cmd/Ctrl+Shift+P and searching for "Reload Window".
Step 2 - Configure Editor Settings
Project-specific editor settings can be configured in a .vscode folder[4] at the root of your project. These settings override your global preferences, ensuring everyone working on the project uses the same editor configuration. Run this command to create the .vscode folder:
mkdir .vscode
Create a file .vscode/settings.json with the following contents:
{
  "editor.defaultFormatter": "oxc.oxc-vscode",
  "editor.formatOnSave": true,
  "editor.tabSize": 2,
  "files.associations": {
    "*.css": "tailwindcss"
  }
}
Here's what each setting configures:
"editor.defaultFormatter": "oxc.oxc-vscode": Use Oxc extension for formatting code."editor.formatOnSave": true: Automatically format code whenever a file is saved."editor.tabSize": 2: Set the indentation width to 2 spaces (the default is 4 spaces)."files.associations": { "*.css": "tailwindcss" }: Use the Tailwind CSS extension for syntax highlighting, Intellisense[5], and code completion in*.cssfiles.
Next, create a file .vscode/extensions.json with the following contents:
{
  "recommendations": [
    "bradlc.vscode-tailwindcss",
    "oxc.oxc-vscode",
    "naumovs.color-highlight"
  ]
}
This file lists recommended extensions for the project. When someone opens the project in VS Code, VSCodium, or Cursor for the first time, they'll see a prompt suggesting they install these extensions. This helps new contributors get the right tooling set up quickly.
Step 3 - Configure Code Formatter
A code formatter automatically restructures your code to follow consistent style rules[6] by fixing indentation, spacing, line breaks, punctuation, etc. without changing the actual code. Run this command to install oxfmt, the formatter provided by the Oxc compiler toolchain:
npm install oxfmt
Create a configuration file oxfmt.config.ts in the project root with the following contents:
import { defineConfig } from "oxfmt"

export default defineConfig({
  ignorePatterns: ["src/routeTree.gen.ts"],
  semi: false,
  sortImports: true,
})
Here's what each option configures:
ignorePatterns: ["src/routeTree.gen.ts"]- Skip the auto-generated routeTree.gen.ts file, since it's managed by TanStack Start and shouldn't be edited or reformatted.semi: false: Omit semicolons at the end of statements (JavaScript doesn't need them).sortImports: true: Sortsimportstatements to keep them consistent and scannable.
Add this script to package.json to format the entire codebase with a single command:
{
  // other fields..
  "scripts": {
    // other scripts..
    "format": "oxfmt"
  }
}
You can now run npm run format to format the entire codebase at once. Additionally, every time you edit a code file and save it, it will be automatically formatted by the Oxc extension.
Step 4 - Configure Code Linter
A linter analyzes your code for potential errors, style issues, and suspicious patterns without running it[7]. It highlights problems like unused variables, missing accessibility attributes, and invalid hooks. Run this command to install oxlint, the linter provided by the Oxc toolchain:
npm install oxlint
Create a configuration file oxlint.config.ts in the project root with the following contents:
import { defineConfig } from "oxlint"

export default defineConfig({
  ignorePatterns: ["src/routeTree.gen.ts"],
  plugins: ["eslint", "typescript", "unicorn", "oxc", "react", "jsx-a11y"],
  rules: {
    "prefer-const": "off", // allow 'let' for variable declaration
    "react/rules-of-hooks": "error", // correct hook call order
    "react/exhaustive-deps": "warn", // complete dependency arrays in useEffect
    "react/jsx-key": "error", // key prop in lists
    "react/jsx-no-target-blank": "error", // safe external links
    "react/jsx-no-duplicate-props": "error", // no repeated props
    "react/no-direct-mutation-state": "error", // use setState instead
    "react/button-has-type": "error", // explicit button type
    "react/iframe-missing-sandbox": "error", // sandbox iframes
    "react/jsx-no-useless-fragment": "error", // remove extra fragments
    "react/jsx-no-comment-textnodes": "warn", // comments outside JSX text
    "react/jsx-no-script-url": "error", // no javascript: URLs
    "react/self-closing-comp": "warn", // self-close empty elements
    "react/checked-requires-onchange-or-readonly": "error", // controlled inputs
    "react/forward-ref-uses-ref": "error", // forwardRef must use ref
  },
})
Here's a brief description of the configuration:
ignorePatterns: ["src/routeTree.gen.ts"]- Skip the auto-generated route tree file.plugins: [...]- Enable recommended rule sets from the Oxlint's built-in plugins [8].rules: { ... }: Override default behavior (disabled/error/warning) of specific rules[9].
Add this script to package.json to lint the entire codebase with a single command:
{
  // other fields..
  "scripts": {
    // other scripts..
    "lint": "oxlint"
  }
}
You can now run npm run lint to check the entire codebase for issues. Additionally, the Oxc extension will highlight lint errors and warnings directly in your code editor as you type.
Step 5 - Configure Tailwind CSS
Tailwind CSS is a utility-first CSS framework that lets you apply small single-purpose classes like flex, p-4, and text-lg to specific HTML tags directly in your JSX instead of defining custom CSS classes separately[10]. Run this command to install Tailwind and its Vite plugin:
npm install tailwindcss @tailwindcss/vite
Add the tailwindcss plugin to vite.config.ts:
import { defineConfig } from "vite"
import { tanstackStart } from "@tanstack/react-start/plugin/vite"
import { nitro } from "nitro/vite"
import viteReact from "@vitejs/plugin-react"
import tailwindcss from "@tailwindcss/vite"

export default defineConfig({
  plugins: [tanstackStart(), nitro(), viteReact(), tailwindcss()],
  server: { port: 3000 },
  resolve: { tsconfigPaths: true },
})
The @tailwindcss/vite plugin scans source files (HTML, JSX, CSS) for utility classes and generates only the CSS that's actually used[11]. Next, create a file src/styles.css and the following code to set up the base styles, utilities, and theme variables[12] from Tailwind:
@import "tailwindcss";
Import the file into src/routes/__root.tsx and add a links entry to load it on every page:
// existing imports..
import appCss from '@/styles.css?url' // <-- add this

export const Route = createRootRoute({
  head: () => ({
    meta: [ /* existing meta tags */ ],
    links: [{ rel: 'stylesheet', href: appCss }], // <-- add this
  }),
  component: RootComponent
})

// existing code..
The ?url suffix tells Vite to return the URL path to the CSS file instead of importing the file's contents. The links array adds a <link rel="stylesheet" href="..."> tag to the <head>.
Next, update src/routes/index.tsx to use Tailwind utility classes instead of inline styles:
import { createFileRoute, Link } from '@tanstack/react-router'
import { useState } from 'react'

export const Route = createFileRoute('/')({ component: IndexPage })

function IndexPage() {
  const [count, setCount] = useState(0)
  return (
    <div className="p-4">
      <nav className="flex gap-2">
        <a className="font-bold">Home</a>
        <Link to="/about">About</Link>
      </nav>
      <p className="mt-4">
        <button
          type="button"
          className="rounded bg-blue-600 px-3 py-1 text-white"
          onClick={() => setCount(count + 1)}
        >
          Click Me: {count} clicks
        </button>
      </p>
    </div>
  )
}
Run npm run dev and open http://localhost:3000 to verify that the new styles are applied.
Step 6 - Install TanStack Devtools
TanStack Devtools gives you an in-browser panel for inspecting and debugging TanStack libraries[13] while your app runs. We'll add the TanStack Router devtools panel to our app to inspect routes, query parameters, and navigation state. First, install the required packages:
npm install @tanstack/devtools-vite @tanstack/react-devtools @tanstack/react-router-devtools
Here's what each package does:
@tanstack/devtools-vite: Vite plugin for seamless integration & enhanced debugging.@tanstack/react-devtools: React component for rendering the TanStack Devtools UI.@tanstack/react-router-devtools: Devtools panel for inspecting TanStack Router.
Add the TanStack devtools() Vite plugin as the first entry in vite.config.ts:
import { defineConfig } from "vite"
import { tanstackStart } from "@tanstack/react-start/plugin/vite"
import { nitro } from "nitro/vite"
import viteReact from "@vitejs/plugin-react"
import tailwindcss from "@tailwindcss/vite"
import { devtools } from '@tanstack/devtools-vite'

export default defineConfig({
  plugins: [devtools(), tanstackStart(), nitro(), viteReact(), tailwindcss()],
  server: { port: 3000 },
  resolve: { tsconfigPaths: true },
})
Import the devtools components in src/routes/__root.tsx and render them in the <body>:
// other imports..
import { TanStackRouterDevtoolsPanel } from '@tanstack/react-router-devtools'
import { TanStackDevtools } from '@tanstack/react-devtools'

export const Route = // existing code..

function RootComponent() {
  return (
    <html lang="en">
      <head><HeadContent /></head>
      <body>
        <Outlet />
        <TanStackDevtools
          config={{ position: 'bottom-right' }}
          plugins={[{
            name: 'TanStack Router',
            render: <TanStackRouterDevtoolsPanel />,
          }]}
        />
        <Scripts />
      </body>
    </html>
  )
}
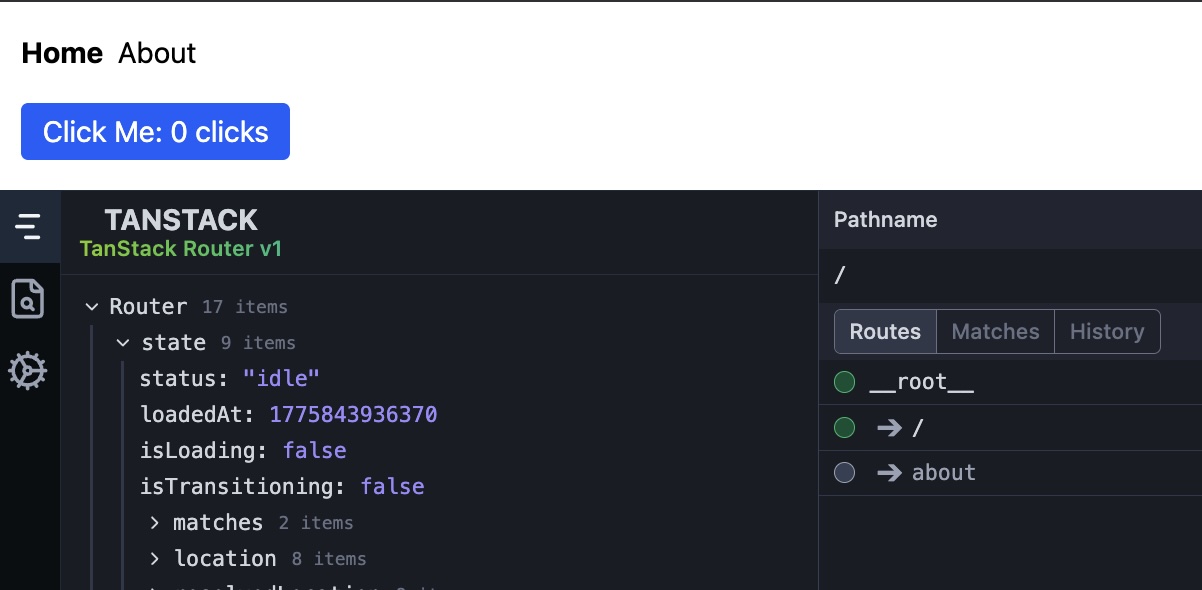
When you run the development server using npm run dev, you'll now see a circular button in the bottom-right corner of the page[14]. Clicking it will
open the TanStack Devtools UI with a Router panel where you can inspect the current state of the router. Here's what it looks like:
NOTE: TanStack Devtools are automatically disabled and excluded from the production build.
Step 7 - Install React Devtools
React Devtools is a browser extension for inspecting React applications. It lets you inspect the React component tree, view or edit props and state, and identify performance problems. It doesn't require any code changes and connects automatically when it detects a React app.
Install the extension for Chrome, Firefox, or Edge, then open your app in the browser and launch the browser's developer tools[15]. You should now see two additional tabs named Components and Profiler to inspect and profile your React app. Here's what it looks like:
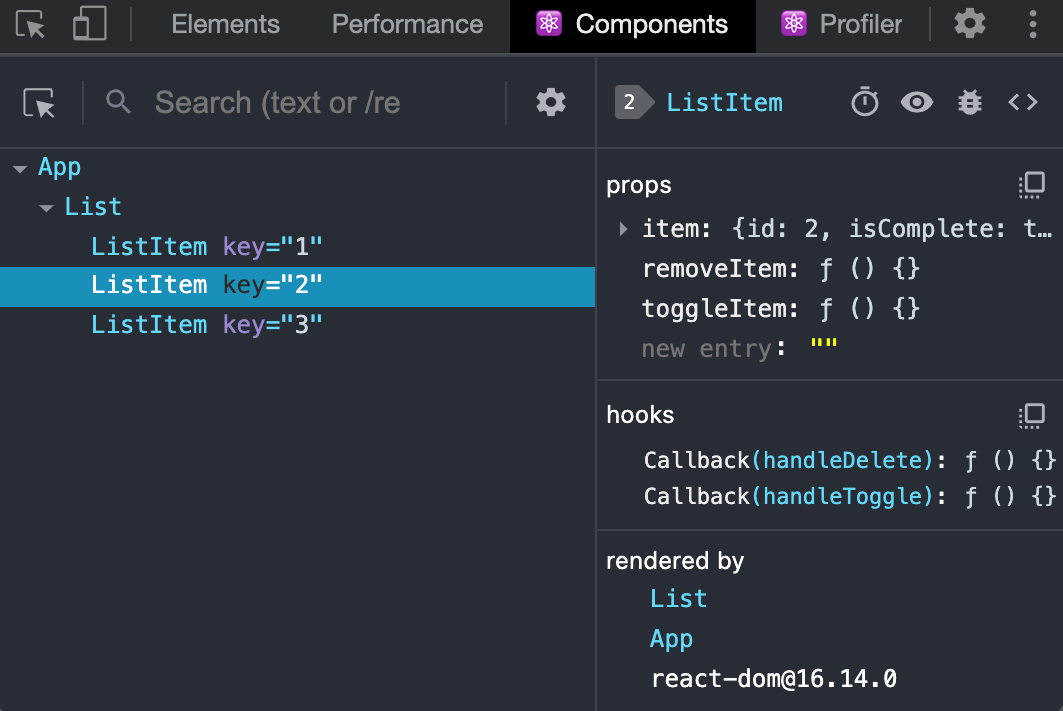
Use the Components tab to ensure your components have the expected props, state, and children during development. Use the Profiler tab to debug rendering & performance issues.
Finally, run these commands to add the changes to Git, create a commit, and push to GitHub:
git add .
git commit -m "Set up development tools and Tailwind CSS"
git push
Conclusion
In this tutorial, we enhanced the development workflow for our TanStack Start app. We installed editor extensions, configured editor settings, set up a code formatter and linter, incorporated Tailwind CSS, and installed TanStack and React DevTools for debugging.
Here's the finished code: https://github.com/swiftace-org/tanstack-start-tutorial/tree/part-2
In the next tutorial, we'll set up a UI component library and design system for the project.
Footnotes
A development workflow refers to the tools and habits you use while building software: editing, formatting, testing, previewing, debugging, and shipping. A good workflow shortens the feedback loop, helping you catch problems and make changes confidently.
The Extensions panel exists in most VS Code-based editors, though the sidebar layout may vary. In VS Code, VSCodium, and Cursor,
Cmd/Ctrl+Shift+Xopens it directly.Oxc is a Rust-based JavaScript and TypeScript toolchain with a parser, formatter, linter, and related compiler tools. Its main appeal is speed: formatting and linting stay responsive enough to run comfortably inside the editor.
The
.vscodefolder stores workspace-specific editor settings, extension recommendations, tasks, and debug profiles. VS Code-compatible editors such as VSCodium and Cursor also read this folder, so the same project-level setup works.IntelliSense is VS Code's name for editor assistance such as autocomplete, parameter hints, hover docs, and inline errors. Extensions can plug into it to provide language-specific support, including Tailwind class completion.
Consistent formatting makes code easier to scan and review, but enforcing it manually is tedious and inconsistent. An automatic formatter removes small style debates, reduces noisy diffs, and keeps the codebase visually uniform. Prettier's rationale explains this.
Linting is a form of static analysis: it inspects source code without running it and flags patterns likely to cause bugs, accessibility issues, or maintenance problems. It complements TypeScript by checking concerns like hook usage and JSX correctness.
Oxlint groups rules into built-in plugins such as
eslint,typescript,react,jsx-a11y,unicorn, andoxc. Enabling a plugin turns on a related family of checks without installing separate lint packages.Each Oxlint rule can usually be set to
off,warn, orerror. This lets you tune strictness per project: errors for must-fix issues, warnings for guidance, and disabled rules for checks that don't fit your codebase.Traditional CSS often means inventing custom class names and writing separate rules for each UI variation. That can create naming overhead, dead CSS, and hard-to-predict cascade behavior. Adam Wathan's essay explains the utility-class approach well.
Tailwind doesn't ship your app with its entire design system upfront. It scans your source files for the utility classes you actually use and generates CSS containing only those styles, which helps keep the final stylesheet relatively small.
Tailwind is customizable through theme values for tokens like colors, spacing, fonts, shadows, and breakpoints. Defining these centrally gives you a consistent design language while still letting you compose styles with utility classes.
TanStack is a family of tools including Router, Query, Table, Virtual, Form, and Start. TanStack Devtools provides one shared debugging UI across them.
The floating button is the TanStack Devtools launcher. The
position: 'bottom-right'config controls where it appears, and thepluginsarray decides which panels are available, such as the Router devtools panel.Browser developer tools (Chrome, Firefox, and Edge) are built-in browser panels for inspecting the DOM, JavaScript, network requests, console logs, storage, and performance. React Devtools appears inside that toolbox as extra tabs.