TanStack Start: Part 1 - Project Setup
TanStack Start is a full stack web framework built on top of React, the popular UI library. This series of tutorials will guide you through the process of building a fully-featured modern web application with TanStack Start. We'll build a personal task management app called DoLater.
To follow along with this tutorial, you'll require Node.js (version 25.x or higher) installed on a computer running macOS, Linux, or Windows WSL. You'll also need a terminal[1] like Ghostty and a code editor[2] like VSCodium. Knowledge of HTML, CSS & TypeScript is assumed here.
Here are the steps we'll follow:
- Initialize a new Node.js project
- Install and configure TypeScript
- Install and configure Vite
- Install and configure TanStack Router
- Define the root React component
- Define file-based routes
- Run and build the application
- Set up a Git repository
Step 1 - Initialize a Node.js Project
Open up a terminal window, and run these commands to create a project folder and enter it:
mkdir dolater
cd dolater
Open the folder in a code editor, and create a file package.json with the following contents:
{
  "name": "dolater",
  "private": true,
  "type": "module"
}
The package.json configuration file is used to describe a Node.js project, keep track of its dependencies, and define scripts for executing the code, running tests, creating production bundles, etc. We'll enhance the file gradually over time. Here's what it currently contains:
"name": "dolater": Sets a unique identifier for the project (used by some CLI tools)[3]"private": true: Prevents accidental publishing to the public NPM package registry[4]"type": "module": Indicates the project uses the ES module syntax (not CommonJS)[5]
Step 2 - Install and Configure TypeScript
The code for the application will be written in TypeScript, a superset of JavaScript with static typing. It catches many errors at compile time, before your code runs. Install the TypeScript compiler and @types/node (type definitions for Node.js built-ins[6]) using this command:
npm install typescript @types/node
These dependencies are downloaded to a node_modules folder in the project root, and they're also automatically listed in the package.json file under the dependencies key[7]:
{
  // added below existing fields..
  "dependencies": {
    "typescript": "^5",
    "@types/node": "^25.3.5",
  }
}
Create a file tsconfig.json in the project root to configure the TypeScript compiler[8]:
{
  "compilerOptions": {
    "paths": { "@/*": ["./src/*"] },
    "jsx": "react-jsx",
    "target": "ES2022",
    "module": "ESNext",
    "moduleResolution": "bundler",
    "skipLibCheck": true,
    "strict": true,
    "noEmit": true,
    "allowImportingTsExtensions": true,
    "noUnusedLocals": true,
    "noUnusedParameters": true,
    "noFallthroughCasesInSwitch": true,
    "noUncheckedSideEffectImports": true
  }
}
Here's a brief description of the important configurations:
paths: { "@/*": ["./src/*"] }: Creates an import alias@/mapping to./src/, so you can writeimport { x } from '@/utils'instead of relative paths like../../utils."jsx": "react-jsx": Transform JSX syntax like<Button title=".." />using React.target: "ES2022": Compiles TypeScript code into the ES2022 version of JavaScript."module": "ESNext": Does not transformimport/exportstatements intorequire().moduleResolution: "bundler": Supports importing modules as preferred by modern bundlers like Vite, without requiring a filename extension (e.g.utils.js) in imports.
The other configurations are largely optional but enforce good programming practices and make the compilation faster. See the official TSConfig reference to learn more about them.
Step 3 - Install and Configure Vite
TanStack Start is built on top of Vite, a powerful & configurable tool[9] that lets you (i) run & preview your web app while developing it, and (ii) optimize & package the app for deploying to production. Run this command to install Vite and some necessary plugins using npm[10]:
npm install vite @tanstack/react-start @vitejs/plugin-react nitro
To configure Vite, create a file vite.config.ts in the project root with the following code:
import { defineConfig } from 'vite'
import { tanstackStart } from '@tanstack/react-start/plugin/vite'
import { nitro } from "nitro/vite"
import viteReact from '@vitejs/plugin-react'

export default defineConfig({
  plugins: [tanstackStart(), nitro(), viteReact()],
  server: { port: 3000 }, // listen for requests on port 3000
  resolve: { tsconfigPaths: true }, // use import "paths" from tsconfig.json
})
During development, Vite reads the project code & dependencies, compiles TypeScript files, caches the results, serves them as ES modules. Plugins add the following functionality:
@tanstack/react-startconfigures Vite to handle HTTP requests using TanStack Start, enabling routing, server-side rendering, response streaming, server functions, etc.nitrois a production-ready web server and bundler that can package the application's server-side code for any deployment target (Node.js, Bun, Cloudflare Workers, etc.)@vitejs/plugin-reactconverts JSX syntax (e.g.<TaskItem id={4} />) into plain JavaScript function calls using React's JSX runtime and enables Fast Refresh.[11].

The setting server.port: 3000 configures Vite to use the network port 3000[12] for the development server, and resolve.tsConfigPaths: true instructs Vite to resolve imports e.g. import { X } from '@/utils' according to the tsconfig.json file defined earlier[13].
Step 4 - Install and Configure TanStack Router
TanStack Start uses TanStack Router as its routing system[14]. Install it with this command:
npm install @tanstack/react-router
Next, run this command to create an src folder which will contain all the application code:
mkdir src
Then, create a file src/router.ts that exports a function getRouter to create the router:
import { createRouter } from '@tanstack/react-router'
import { routeTree } from './routeTree.gen'

export function getRouter() {
  const router = createRouter({
    routeTree,
    scrollRestoration: true,
  })

  return router
}
Note: You might see a TypeScript import error because the file routeTree.gen.ts containing the typed route tree doesn't exist. This file will be auto-generated later by TanStack Start[15].
This router matches the incoming request URL (e.g. /tasks/34) against a tree of routes to determine which file from src/routes should generate the response (e.g. tasks/$id.tsx).
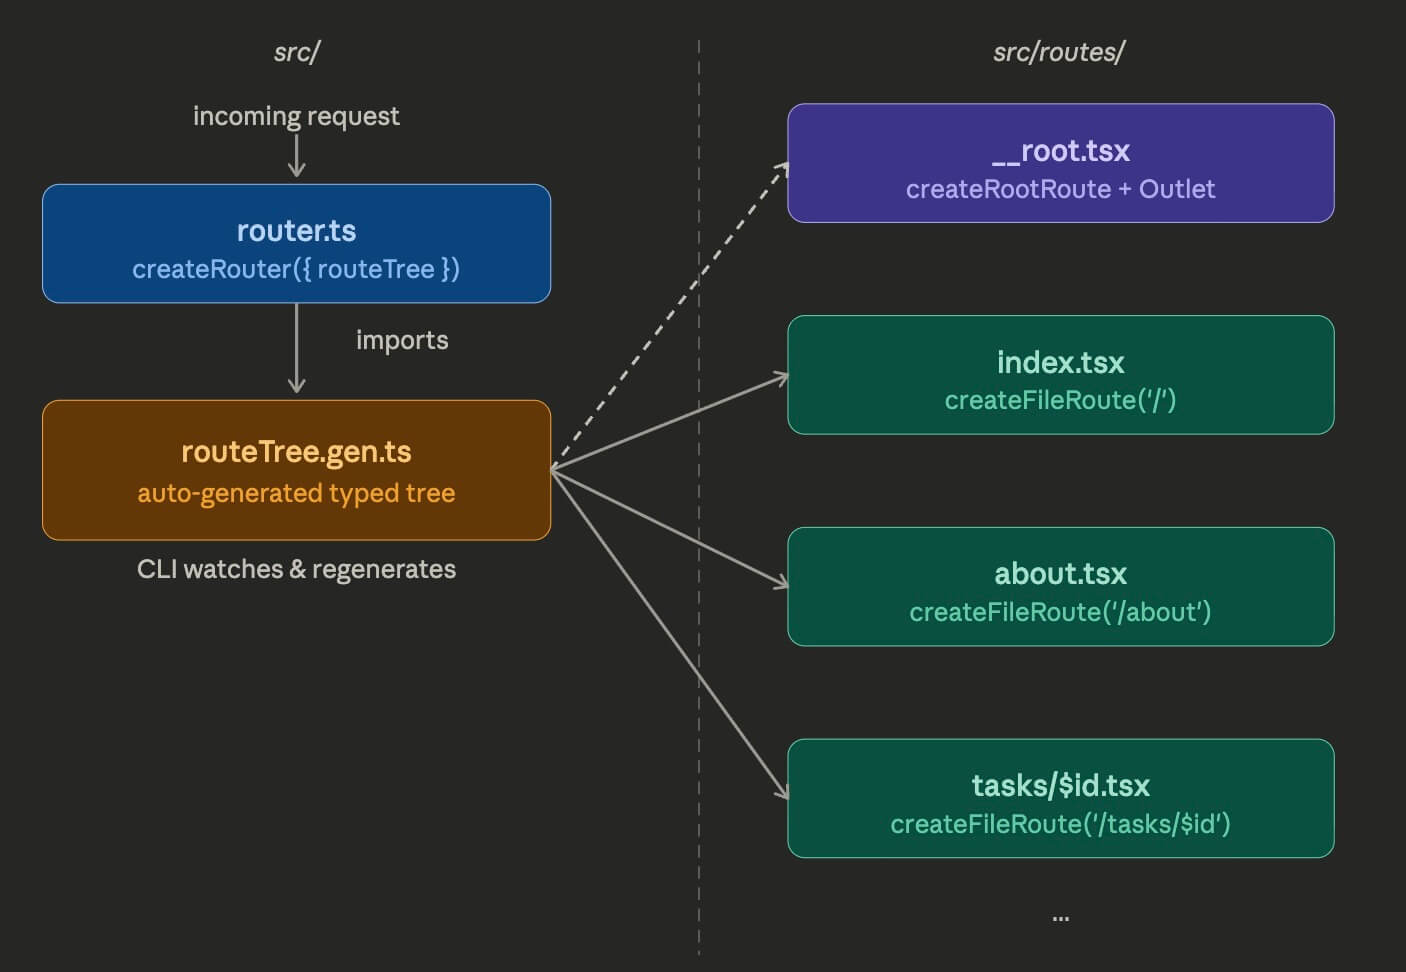
This approach, where the framework automatically creates route handlers based on the file and folder structure of the project, is called file-based routing. TanStack Router offers a powerful, flexible, and fully type-safe file-based routing system as described in the docs.
Step 5 - Define the Root React Component
We can now start building the user interface of our web application using React components. Run this command to install react and react-dom[16] along with their type definitions:
npm install react react-dom @types/react @types/react-dom
Run this command to create the folder src/routes which will contain all the route files:
mkdir src/routes
TanStack Start requires a special "root" route which wraps every other route and defines a root React component for the outer HTML shell of the application i.e. the <html>, <head>, and <body> tags. Create a file src/routes/__root.tsx with the following contents:
/// <reference types="vite/client" />
import {
  Outlet,
  createRootRoute,
  HeadContent,
  Scripts
} from '@tanstack/react-router'

export const Route = createRootRoute({
  head: () => ({
    meta: [
      { charSet: 'utf-8' },
      { name: 'viewport', content: 'width=device-width, initial-scale=1' },
      { title: 'DoLater' },
    ],
  }),
  component: RootComponent,
})

function RootComponent() {
  return (
    <html>
      <head><HeadContent /></head>
      <body>
        <Outlet />
        <Scripts />
      </body>
    </html>
  )
}
Here's a brief description of the important parts of the code:
createRootRouteis used to create the root route with aheadand acomponent.headis used to configure<meta>,<script>, and<link>tags[17] for the app.componentconfiguresRootComponentto be used as the outer shell of the app.RootComponentis a React component containing<html>,<head>&<body>tags.HeadContentinjects all user-configured tags (from root & child routes) into<head>.Outletrenders the actual page content from the matched child route (e.g./about).Scriptsinjects the JavaScript bundles needed for React's client-side interactivity[18].
Step 6 - Define File-Based Routes
Let's create two routes[19]: the "Home" page / (TanStack calls this an "index" route), and an "About" page /about. Create a file src/routes/index.tsx with the following contents:
import { createFileRoute, Link } from '@tanstack/react-router'
import { useState } from 'react'

export const Route = createFileRoute('/')({
  component: IndexPage,
})

function IndexPage() {
  const [count, setCount] = useState(0)
  return (
    <div>
      <nav style={{ display: 'flex', gap: 4}}>
        <a>Home</a>
        <Link to="/about"> About </Link>
      </nav>
      <p>
        <button onClick={() => setCount(count + 1)}>
            Click Me: {count} clicks
        </button>
      </p>
    </div>
  )
}
Every route file must export a Route created with createFileRoute[20], which configures a component used to generate the response. Here, the IndexPage React component renders a couple of links ("Home" and "About") and a button that can be clicked to update a counter.
Next, create a route file src/routes/about.tsx which renders the about page (/about):
import { createFileRoute, Link } from '@tanstack/react-router'

export const Route = createFileRoute('/about')({
  component: AboutPage,
})

function AboutPage() {
  return (
    <div>
      <nav style={{ display: 'flex', gap: 4}}>
        <Link to="/">Home</Link>
        <a>About</a>
      </nav>
      <p>DoLater is a task management app for lazy people.</p>
    </div>
  )
}
We now have all the files we need, and the project folder should have the following structure:
dolater
├── node_modules/          # generated by NPM, contains dependencies
├── src/                   # contains all the application code
│   ├── routes/            # contains route files
│   │   └── `__root.tsx`   # contains root route (application shell)
│   │   └── `index.tsx`    # "/" route (Home page)
│   │   └── `about.tsx`    # "/about" route (About page)
│   ├── `router.ts`       # exports getRouter function
├── `package-lock.json`    # generated by NPM, tracks package versions
├── `package.json`         # project metadata, dependencies, and scripts
└── `tsconfig.json`        # configuration for TypeScript compiler
├── `vite.config.ts`       # plugins and configuration for Vite
TanStack Route also supports dynamic routes (e.g. tasks.$id.tsx) that can handle any route matching a pattern (e.g. /tasks/34, tasks/45). We'll explore these in future tutorials.
Step 7 - Run and Build the Application
Add a scripts section[21] to package.json to develop, build, and preview the app with Vite:
{
  // add this below existing fields..
  "scripts": {
    "dev": "vite dev",
    "build": "vite build",
    "start": "node .output/server/index.mjs"
  }
}
Run this npm command to invoke the dev script and start the Vite development server:
npm run dev
Open the link http://localhost:3000 in a web browser to view the "Home" page of the app:

Clicking the button increments the counter, and clicking "About" navigates to /about and updates the URL. TanStack Router also auto-generates src/routeTree.gen.ts containing the typed route tree based on the files in src/routes/ whenver routes are added/modified.
Run the following command to prepare a packaged bundle for deployment to production:
npm run build
Vite and Nitro compile and optimize the application, writing the output to an .output/ folder. The .output/public/ subfolder contains static assets (HTML, CSS, JavaScript), and the .output/server/ subfolder contains the Node.js server code for handling HTTP requests.
Run npm run start to start the production server and verify that the final build works:
npm run start
Open http://localhost:3000 in a browser to view the production build. Unlike the dev server, which compiles the source code in src on the fly, you're now running the fully compiled, optimized application from the .output folder. It can be deployed to a hosting provider[22].
Step 8 - Set Up a Git Repository
Git is a version control system[23] that tracks changes to your code over time. It lets you save snapshots of your project, revert to earlier versions, share your project's source code online, and collaborate with others. Let's set and publish up a a Git repository for our project.
Create a README.md file in the project root with some documentation about the project:
# DoLater

DoLater is a task-management app built with TanStack Start.

## Important commands

1. `npm install` - Install dependencies
2. `npm run dev` - Run Vite development server
3. `npm run build` - Build production bundle
4. `npm start` - Run production server
Create a .gitignore file[24] in the project root to prevent tracking of certain files & folders:
node_modules
.DS_Store
dist
dist-ssr
*.local
.env
.nitro
.tanstack
.wrangler
.output
.vinxi
__unconfig*
These are generated files and folders (like node_modules/, dist/ & .output/) that can be recreated from source code, or local environment files (like .env) that may contain secrets.
Now initialize a Git repository, add the files we've created, and create your first commit[25]:
git init  # Create a new Git respository in the project root
git add . # Include add files & folders within the current folder
git commit -m "Initial commit" # Record a snapshot with a message
You can push the repository to GitHub[26] to back up your code and share it. Create a new repository on GitHub (without a README or .gitignore), then connect and push as follows:
git remote add origin https://github.com/<username>/dolater.git
git push -u origin main
Replace <username> with your GitHub username. The -u flag sets origin/main as the default upstream branch, so future pushes only require git push. You'll need to generate and provide a personal access token to authenticate yourself with GitHub while pushing.
Conclusion
In this tutorial, we set up a TanStack Start project from scratch. We initialized a Node.js project, configured TypeScript & Vite, set up file-based routing, created a root component & two page routes, ran the development server, built the app, and pushed the code to GitHub.
Here's the finished code: https://github.com/swiftace-org/tanstack-start-tutorial/tree/part-1
In the next tutorial, we'll focus on improving the development workflow with IDE extensions, code linting & formatting, browser-based devtools, and guidelines for AI coding agents.
Footnotes
A terminal is a text-based interface for typing and executing commands on your computer. On macOS you can use the built-in Terminal.app, though alternatives like Ghostty offer better performance and customization.
A code editor provides syntax highlighting, auto-completion, and error detection for writing code. VSCodium is a free, open-source build of VS Code without Microsoft's telemetry and proprietary additions.
The
namefield is used bynpmto identify the package in error messages, when publishing, and when other packages list it as a dependency. For private projects, it mainly appears in logs and tooling output.The NPM registry is a public repository of JavaScript packages that anyone can publish to and download from. Setting
private: trueensures you can't accidentally publish your project's code there.ES modules use
import/exportsyntax (standardized in ES2015), while CommonJS usesrequire()/module.exports. Most modern tools and browsers support ES modules natively, making them the preferred choice for new projects.@types/nodeprovides TypeScript type definitions for Node.js built-in modules likefs,path, andprocess. Without it, TypeScript won't recognize Node.js globals used by TanStack Start's server-side code.Running
npm installdownloads packages intonode_modules/and records their exact versions inpackage-lock.json. Thedependenciessection inpackage.jsontracks which packages your project needs, using version ranges like^5.The
tsconfig.jsonfile controls how the TypeScript compiler checks and transforms your code. It configures language features, module resolution, strictness levels, and output format all in one central place.Vite (French for "fast") uses native ES modules to serve files on demand during development, avoiding the slow bundling step of older tools like Webpack. It also uses Rollup under the hood for optimized production builds.
npm(Node Package Manager) is the default command-line tool for installing and managing JavaScript packages. Package names prefixed with@(like@tanstack/react-start) belong to an organization scope on the NPM registry.Fast Refresh instantly updates React components in the browser when you save a file, without losing component state. This makes the development feedback loop much faster compared to a full page reload.
A network port is a numbered endpoint (0–65535) that identifies a specific service on your computer. Port 3000 is commonly used for local development servers. If it's already in use, Vite will automatically pick the next available port.
Without
tsconfigPaths, Vite wouldn't understand import aliases like@/utils. This setting makes Vite read thepathsmapping fromtsconfig.json, so both TypeScript and Vite resolve these imports consistently.A router maps URL paths to components that render the page content. TanStack Router is a type-safe router for React that supports file-based routing, nested layouts, search parameter validation, and automatic code splitting.
When the dev server starts, TanStack Start scans
src/routes/and generatessrc/routeTree.gen.tsautomatically. This file contains a typed route tree that the router uses to match URLs to components, and it updates whenever route files change.reactis the core library providing component APIs likeuseStateanduseEffect.react-domprovides the rendering layer that connects React components to the browser's DOM, handling updates and event delegation.<meta>tags provide metadata like character encoding and viewport settings.<script>tags load JavaScript files.<link>tags reference external resources like stylesheets and favicons. Together they configure how browsers display the page.The server bundle runs on the server to render the initial HTML for each request (server-side rendering). The client bundle runs in the browser to make the page interactive by handling clicks, state updates, and navigation without full page reloads.
A route defines the URL pattern and data-loading logic for a path, while the page is the React component that renders the visual content. In TanStack Start, each route file configures both: the route definition and its associated page component.
createFileRoutetakes the route path as a string argument (e.g.'/'or'/about') so TanStack Router can verify at build time that the file location matches its declared route.The
scriptssection inpackage.jsondefines shortcut commands you can run withnpm run <name>. This lets you use simple names likedev,build, andstartinstead of typing out the full underlying commands each time.A hosting provider runs your application on their servers so it's accessible on the internet. Popular options for TanStack Start apps include Vercel, Netlify, and AWS.
A version control system records every change made to your files, who made it, and when. This lets you undo mistakes, compare versions, and work on features in parallel using branches without losing previous work.
A
.gitignorefile lists patterns for files and folders that Git should not track. Git matches these patterns (one entry per line) against file paths and silently skips anything that matches when staging or committing.A commit is a snapshot of your project at a specific point in time, identified by a unique hash (e.g.
a1b2c3d). Each commit records what changed, who made the change, and a message describing why.GitHub is a cloud platform for hosting Git repositories. It adds collaboration features like pull requests, issue tracking, and code review on top of Git. Alternatives include GitLab and Bitbucket.